Insert Light Fixture Project Schedule
A light fixture schedule that lists all of the light fixtures used in the current project can be inserted on the drawing.
To insert this schedule onto the drawing, go to
Ribbon: DM Photometrics→Schedule→ ![]() Insert
Insert
Pulldown Menu: DM Photometrics→Light Fixture Schedule→Insert Light Fixture Project Schedule
Insert Light Fixture Project Schedule Dialog Box

-
Schedule Notes: A note that will appear below the schedule when inserted on the drawing.
-
☐ Maximum Schedule Height: Whether the schedule has a maximum height. This height is inches on the printed page.
If this is not checked, the schedule will be in a single schedule.
If this is checked, you can specify the maximum height of the schedule. When the schedule exceeds this height, it will be continued in a second schedule next to the first. The label of the second schedule will have the Schedule title continued label option added to it to indicate that it is a continuation of the first schedule. See the Schedules options section for more information.
-
Press this button to specify the ☐ Maximum Schedule Height on the drawing. The dialog box will be closed and you will be prompted to specify the height.
Specify maximum schedule height:
The distance you enter on the drawing will be used as the maximum height. It is simplest to draw a line straight down to where the bottom of the schedule should be located.
-
☐ Zoom to Schedule After Insertion Whether the display will be moved to the schedule location after it has been inserted or updated.
-
☐ Show Unused Light Fixtures Whether light fixtures in the schedule that have not been inserted on a drawing will be displayed in the schedule.
-
Press this button to modify the layout of the light fixture schedule on the drawing. See the Edit Light Fixture Schedule Layout section below for more information.
Edit Light Fixture Schedule Layout
The Light Fixture Schedule Label Display and Order dialog box is used to configure the appearance of the light fixture schedule on the drawing for the current project.
To change the appearance in the master database for future projects, use the Edit Light Fixture Schedule Master Settings command.
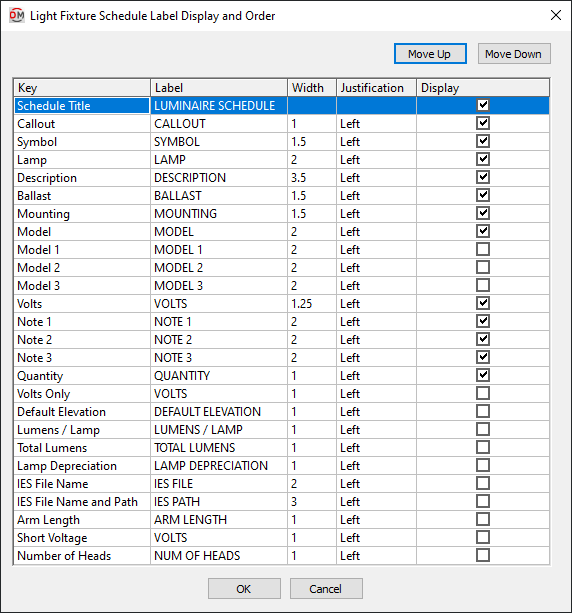
Grid Columns
-
Key ☰ The identifier for the column, describing what value it will display. The value in this column is fixed and cannot be changed.
-
Label The name that will be displayed for the column.
-
Width The width of the column in inches on the printed drawing.
-
Justification ▾ The justification of the text values in the column. The justification of the title for the schedule and of the column headers are set using the Schedule title justification ▾ options and the Schedule column label justification ▾ option in the Options command.
- Left The text is left-justified.
- Center The text is center-justified.
- Right The text is right-justified.
-
☐ Display Whether the column is shown on the schedule. If this is not checked, the value will not be displayed.
Grid Rows
Each row in the list corresponds to a column in the light fixture schedule. The top column in the list will be the leftmost column in the schedule.
-
Move the selected row up in the list. This moves the corresponding column to the left in the schedule.
-
Move the selected row down in the list. This moves the corresponding column to the right in the schedule.
-
Schedule Title The title of the schedule. This row is always listed first and cannot be moved up or down. The Label of this key is the title of the schedule. The Width and ☐ Display values of this key are ignored. The width of the title is based upon the width of the columns in the schedule. The title is always displayed with the schedule.
The other values in the Key ☰ column are listed alphabetically below.
-
Arm Length The arm length taken from the schedule.
-
Ballast The ballast taken from the schedule. Each of the Ballast values from the schedule will be listed on a separate line.
-
Callout The name of the light fixture as defined in the light fixture schedule.
-
Default Elevation The default mounting height taken from the schedule.
-
Description The description taken from the schedule.
-
IES File Name The name of the IES file for the light fixture.
-
IES File Name and Path The file path for the IES file for the light fixture.
-
Lamp The number of lamps, watts per lamp, and description taken from the schedule.
-
Lamp Depreciation The lamp depreciation taken from the schedule. Each of the Lamp Depreciation values from the schedule will be listed on a separate line.
-
Lumens / Lamp The lumens per lamp for the fixture. Each of the Lumens / Lamp values from the schedule will be listed on a separate line.
-
Model All three Model fields taken from the schedule. Each model will be listed on a separate line.
-
Model 1 The model taken from the schedule. Each model is listed in a separate column.
-
Model 2 The model taken from the schedule. Each model is listed in a separate column.
-
Model 3 The model taken from the schedule. Each model is listed in a separate column.
-
Mounting The mounting taken from the schedule.
-
Note 1 Note taken from the schedule.
-
Note 2 Note taken from the schedule.
-
Note 3 Note taken from the schedule.
-
Number of Heads The number of heads taken from the schedule.
-
Quantity The number of light fixtures inserted in the project. If a light fixture type is not inserted, NOT USED will be displayed.
-
Short Voltage The voltage value and poles of the light fixture. Examples: 120V 1P, 208V 2P
If Volts ▾ is set to Universal, UNIVERSAL will be displayed.
-
Symbol The block used to represent the light fixture. The block is rotated and scaled so that it will fit into the schedule.
-
Total Lumens The total lumens for the fixture.
-
Volts The full voltage value of the light fixture. The volts, poles, and wires will be displayed. Examples: 120V 1P 2W, 208V 2P 2W
If Volts ▾ is set to Universal, UNIVERSAL will be displayed.
-
Volts Only The voltage value of the light fixture. Only the volts will be displayed. The poles and wires will not be displayed. Examples: 120V, 208V
If Volts ▾ is set to Universal, UNIVERSAL will be displayed.
Inserting or Updating the Schedule on the Drawing
To insert or update the schedule, press the button.
Inserting the Schedule the First Time
If the light fixture schedule is not currently inserted on the drawing, you will be prompted for the insertion location of the schedule.
Specify insertion point for the light fixture schedule:
The location you specify will be used as the top-left corner for the light fixture schedule.
Updating the Schedule Already on the Drawing
If the light fixture schedule is already inserted on the drawing, it will be updated in its current location.
You must update the schedule on the drawing when changes are made to the project schedule. The schedule will not update automatically.
If additional graphics, such as revision clouds, have been inserted over the schedule graphic, be sure to check their location after updating the schedule.
Schedule title justification: Sets the justification for the schedule title.
Schedule column label justification: Sets the justification for column headings.
Schedule title continued label: Sets the label added to the schedule title for continued sections.