Insert Calculation Area
The Insert Calculation Area command is used to insert a flat area on the drawing where illuminance levels are to be calculated.
To insert a calculation area on the drawing, go to
Ribbon: DM Photometrics→Calculation Areas→ ![]() Insert
Insert
Pulldown Menu: DM Photometrics→Insert Calculation Area
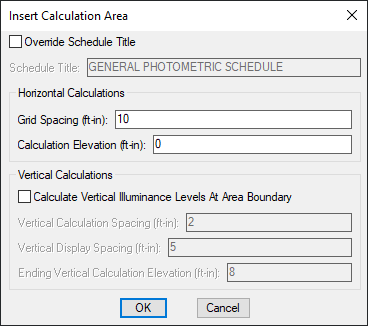
Insert Calculation Area Dialog Box
-
☐ Override Schedule Title Whether the schedule title for the current calculation area is to be changed from the default calculation schedule title.
-
Schedule Title: The title to be used in the calculation schedule for the calculation area. This field is enabled if the ☐ Override Schedule Title box is checked.
-
Grid Spacing: The distance between points where illuminance levels will be calculated.
-
Calculation Elevation: The elevation at which the calculation will be performed.
-
☐ Calculate Vertical Illuminance Levels At Area Boundary Whether vertical illuminance levels are to be calculated at the edges of the calculation area.
-
Vertical Calculation Spacing: The distance between points where vertical illuminance levels will be calculated.
-
Vertical Display Spacing: The distance between vertical calculation points as they are displayed on the drawing.
-
Ending Vertical Calculation Elevation: The maximum height at which vertical illuminance levels will be calculated.
Inserting the Calculation Area on the Drawing
To insert the calculation area on the drawing, press the button. The settings you specified in the dialog box will be used for the area.
You will be prompted to draw the calculation area on the drawing.
Specify first point of calculation area or [<Select existing boundary>]:
-
First point of calculation areaSpecify a point on the drawing. Continue entering points on the drawing until the calculation area is complete. Press ENTER to finish drawing the calculation area. -
Select existing boundaryPress ENTER to draw the calculation area by tracing a polyline on the drawing. Specify the polyline on the drawing to be traced. You will be asked whether to erase the polyline after the calculation area is inserted.
You will then be prompted to insert the calculation schedule, group the calculation area with another area, or press ENTER to finish the command.
Specify insertion point for calculation schedule or point inside boundary to group with:
-
Insert the calculation scheduleTo insert the calculation schedule, select a point on the drawing that is not inside of another calculation area. The calculation schedule will be inserted at the point specified. -
Group the area with another area or groupTo group the area with another area or group, select a point on the drawing that is inside of another calculation area. The two calculation areas will be grouped. If the selected calculation area already has a calculation schedule on the drawing, that calculation schedule will be used for the group. If it does not have a calculation schedule, no calculation schedule will be used for the group. -
Finish the commandPress ENTER to finish the command without inserting a calculation schedule or grouping the calculation area with an area or group. No calculation schedule will be inserted and the calculation area will be in its own separate group.
Schedule title justification: Sets the justification for the schedule title.
Schedule column label justification: Sets the justification for column headings.
There are several options that set the default values for this dialog box. See the Calculation Areas Options section for more information.